Help
Organization Accounts
Master Lock® Vault Enterprise is an access management software solution designed for businesses that have many users who need access to many locks. This platform, using Master Lock® Bluetooth-enabled locks, provides a convenient way for businesses to control access, oversee assets, and improve accountability across their organization.
Organizations
Users and locks needing to share access across your organization must all belong to the same organization account. Once your organization has registered its new Master Lock® Vault Enterprise account, your primary administrator may sign in and begin inviting users and adding locks. Locks may only be registered under a single organization, whereas people may accept multiple user invitations from different organizations. If you work with multiple organizations, you’ll have a different sign-in for each, and will need to manage each sign-in independent of the others.
Sign In
Sign into the Master Lock® Vault Enterprise website or mobile app using three required pieces of info:
- Your organization’s ID, the unique code used to identify your organization’s account, provided in your invitation.
- Your email address, to which you received your invitation.
- Your password, or the temporary password provided in your invitation. Temporary passwords expire after a week, so please ask your administrator to send a new password if yours expires.
The first time you sign in with your temporary password you’ll be asked to change your password and agree to our Privacy Policy and Terms of Use to continue. Please note that the website uses cookies to securely manage the browser session for your personal sign-in, but does not track your personal information or online behavior.
Change / Forgot Password
You can request a password recovery email if you’ve forgotten your password by pressing the “Forgot Password?” link under the “Sign In” button on the Web or in the App.
- Enter your email address and press “send”, and the system will send a new temporary password to that email address.
- Sign in using that temporary password before it expires, and you’ll be asked to change your password to something new.
Whenever you’re signed in, you may proactively choose to change your password.
- Click your name in the Web to view “My Info” and press the “Change Password” button.
- Or open the menu in the mobile app to select the “Change Password” option.
- Enter a new password (twice) in accordance to your organization’s Password Policy requirements.
Locks

Master Lock® Vault Enterprise is designed to be used with any Enterprise-enabled Master Lock Bluetooth® hardware currently on the market, as well as exciting new hardware in development. See our Bluetooth® Padlock and Bluetooth® Lock Box product guides for more help using your specific type of lock.
Master Lock® Vault Enterprise-enabled locks have model numbers ending with “ENT.” If you’ve already purchased a non-Enterprise lock (with a model number ending in “D” or “DLH”), you may still register it to your Master Lock® Vault Enterprise account after purchasing a one-time Enterprise-enabled upgrade for it through the website.
Adding Locks
The easiest way to register a new Enterprise-enabled lock is by using your mobile app:
- Press the icon in the top right corner of the app.
- Use the toggle at the top of the New Lock screen to choose between entering your activation code using your phone’s keypad to type it in, or by using your phone’s camera to scan your QR activation code.
Only Enterprise-enabled locks include a QR activation code on their instruction sheets. Locks that are not Enterprise-enabled may only be registered by manually entering their activation code and device ID using your phone’s keypad.
- When scanning, center the QR code from the top-left corner of your paper instructions between the crosshairs from your phone’s camera display and your lock will be automatically registered to the account you’re signed into.
- When using keypad entry, type in the Activation Code found at the top of your paper instructions. Then type in the Device ID found etched on the metal body of your lock. Lock boxes have their Device IDs etched on their bottom, and padlocks have them etched on their back. You’ll need to remove the protective rubber case from the bottom of your outdoor padlock to see its device ID.
- If your lock is not Enterprise-enabled, it will be held in a pending status (not visible within your list of Authorized Locks) until an administrator purchases an upgrade for it using the website.
- Administrators may choose to immediately edit the lock’s settings, or continue adding additional locks.
Administrators may choose to add new locks using the website.
- View your “Locks” tab and press the “ Add a New Lock” button to the right of the screen.
- Enter your lock’s Device ID and Activation Code, and press the “Activate” button.
Remember, a lock may only be registered to a single Master Lock® Vault account. If your lock was previously registered to your Master Lock® Vault eLocks account, you must first delete it from that account (don’t forget to write down its Activation Code and Device ID), add it to your Master Lock® Vault Enterprise account, and purchase an Enterprise-enabled upgrade before you may begin using it.
Always complete your lock activation by unlocking it with the mobile app. A lock is not fully activated until it has been initialized by the mobile app.
Upgrading Locks
Administrators will see a banner across their website’s “Locks” tab if your organization has any pending locks that were added, but still need a Master Lock® Vault Enterprise-enabled upgrade before they can be used.
- Press the “Upgrade Now” button on this banner to navigate to our store and begin the checkout process for all your organization’s pending locks.
- You will navigate to our store, with your cart containing a quantity of “Vault Enterprise Lock Upgrade” matching the number of pending locks in your account.
- Enter your contact information, as it appears on your credit or debit card, and press the “Update” button. Note, we do not save any of your credit or debit card information in our system. You will need to re-enter this information upon any subsequent upgrade.
- Review your contact information and press “Edit” if it’s incorrect, or “Continue” to proceed.
- Enter your credit or debit card information and press “Pay Now.” You will see a confirmation when the payment has been verified, and may return to your Lock list.
- Upon returning to your Lock list, we will apply your upgrades and move your locks into your list of authorized locks, at which point they become available in your account.
Your locks are now Master Lock® Vault Enterprise-enabled and fully compatible with our system. Note that upon deleting any upgraded locks (model numbers ending with “D” or “DLH”) those upgrades will be lost and your lock will be treated as a non-Enterprise lock when it’s reused in the future.
Authorized Locks
Both the mobile app and Web app will show a list of all the locks you’re authorized to access for your organization.
Select a lock on your list to view its details, using the tabs to navigate between its settings, last known location, and history.
Refresh your Authorized list (by swiping down on the mobile app or pressing the refresh button in the lower-left corner of the website) to ensure you’re viewing the latest information.
Deleting a Lock
Administrators may delete a lock from the website, by selecting the lock from their list and pressing the “ Delete Lock” button.
Before deleting, be sure to save your lock’s Activation Code and Primary Code for future reference. Once it’s deleted you won’t be able to look up its Primary Code in the system, get a Temporary Code, or unlock it via Bluetooth. You will only be able to unlock it using its manual codes, and its Activation Code is required to reactivate the lock in Master Lock® Vault in the future.
Note that upon deleting any upgraded locks, those upgrades will be lost and that lock will only have whichever features it was originally purchased with if you reactive it in the future.
To verify you truly wish to delete this lock, enter its Device ID in the text field and press the “ Delete” button. At this point it will be removed from your system and nobody will be able to get new digital keys or manual entry codes to access it. However, any existing keys or codes will continue working until they expire.
Editing Lock Settings
Only administrators may edit lock settings. Select a lock from your lock list to view its details. Its settings tab will display the following information:
- Auto-Relock Delay. The number of seconds the lock will wait if not opened after it’s unlocked, before it automatically relocks itself.
- Primary Code. The manual entry code used to unlock that lock via its keypad. Padlock codes are composed of directional arrows. To type an arrow using your computer keyboard, press the U (up), D (down), L (left), or R (right) key. Padlock codes must be 7 to 13 arrows long, starting with Up. Lock box codes must be 4 to 8 digits long and cannot start with 0.
- Secondary Codes (lock boxes only). Up to 5 additional (optional) manual entry codes that may be used to unlock that lock box’s door via its keypad. Lock box codes must be 4 to 8 digits long and cannot start with 0.
Press the pencil icon in the top-right corner of the mobile app, or the “ Edit Lock” button to the right of the website screen to edit that lock’s settings.
- Enter your new values and press the “Done” button on the app, or “Save” button on the website.
- New settings are saved as “Pending Update” values until they are written to your lock. New settings are only applied to a lock when an authorized user wakes that lock and uses their mobile app (with an Internet connection) to unlock it via Bluetooth. Old settings will continue to function until the new settings are applied in this manner. Once new settings are applied they will appear as “on lock.”
Administrators may also use the website to edit lock settings in bulk, changing the same setting across multiple locks at once:
- From your lock list, select multiple locks by checking the checkbox on the left of that row.
- The buttons to the right of the list will dynamically update, showing the number of locks currently selected, and all the applicable actions you may take on those specific locks.
- Press a button to take that action, and the corresponding dialog will display. Once you enter and save your new value, the system will edit that setting on all your selected locks.
Temporary Codes
Master Lock Bluetooth locks contain an internal clock that rotates their secret “temporary code” to a new code every 4 hours. This code is a manual entry code (similar to a Primary Code) that may be entered using the lock’s keypad to unlock it. Using Master Lock® Vault Enterprise any authorized user may view the current temporary code for a lock they are authorized to access. Administrators may also view temporary codes for future time windows.
- Select a lock from your list of authorized locks and view its details.
- View the Settings tab and press “ Get Temporary Code”.
- Administrators may choose which date and time.
- Press the View button and the code will be displayed.
Note, because manual codes are entered using your lock’s keypad, its history will not be able to show who specifically entered that code to unlock that lock. Rather, the history log will show that the lock was unlocked using a temporary code, and you can scroll back in time to see which users had viewed a temporary code for that date and time for that lock.
Last Known Location
Master Lock® Vault Enterprise records the GPS coordinates of your lock according to your mobile phone whenever it’s used to unlock it via Bluetooth. This is only visible for a single lock when viewing that lock’s details, only shows the most recent coordinates, and is subject to the accuracy and availability of your phone’s GPS location.
History
Master Lock® Vault Enterprise records the access history and settings changes for each individual lock. To view a lock’s history, select that lock from your list of authorized locks to view its details, and navigate to its "History" tab. The mobile app will only show the 20 most recent events, while the website will display much more. A lock’s history remains visible in your Global History view even after you delete that lock, and will persist if you reactivate that lock in the future.
ShowingTime® Lock Integration
A lock box may be integrated with our authorized partner, ShowingTime, a real estate showing management service for MLSs, Brokers and Agents. Your organization’s administrators may link their lock boxes to a ShowingTime account by purchasing a one-time upgrade for each lock box using the Master Lock® Vault website:
- From your lock list, select one or more lock boxes by checking the checkbox on the left of each row.
- Click the “ Upgrade for ShowingTime” button that appears to the right of the list.
- You will navigate to our store, with your cart containing a quantity of “ShowingTime Lock Integration” matching the number of lock boxes you selected.
- Enter your contact information, as it appears on your credit or debit card, and press the “Update” button. Note, we do not save any of your credit or debit card information in our system. You will need to re-enter this information upon any subsequent upgrade.
- Review your contact information and press “Edit” if it’s incorrect, or “Continue” to proceed.
- Enter your credit or debit card information and press “Pay Now.” You will see a confirmation when the payment has been verified, and may return to your Lock list.
- Upon returning to your Lock list, we will apply your upgrades and display the secure “Sharing Code” you’ll need to provide ShowingTime to complete the integration. This code will also be sent to you via email.
- Log in to your ShowingTime account to complete the integration process.
Lock boxes integrated with ShowingTime will remain fully under your control, managed through your Master Lock® Vault Enterprise organization account. To disconnect your lock box from a ShowingTime account, view that lock’s details on the Master Lock® Vault Enterprise website and press the “Disconnect” link at the top of the page.
Note that upon deleting or disconnecting any upgraded lock boxes, their ShowingTime integration will be revoked and you will need to repurchase a ShowingTime upgrade if you choose to reconnect in the future.
Bluetooth Unlocking
The most important feature in Master Lock® Vault Enterprise is the ability to unlock your authorized locks using only your phone. This interaction between your mobile app and your lock is vital for updating lock settings, recording its last known location, and downloading its access history.
Master Lock’s patented wireless communication technology provides enhanced security not only by eliminating the threats involved with physical keys, but by preventing the threat of Bluetooth hacking that exists with some other Bluetooth products. To provide leading-edge security, we employ robust, military-grade authentication and encryption mechanisms built upon proven, NIST recommended and FIPS approved algorithms to deter sniffing, replay and manipulation attempts that Bluetooth technology has been associated with. These mechanisms are regularly audited by independent security professionals.
Digital keys are unique encrypted files downloaded to your mobile app that are only good for unlocking a particular lock by a particular user during a limited predefined time. As long as your app remains connected to the Internet and you’re still authorized to access a lock, your app will automatically download a new key once the previous key expires.
Wake & Tap
To unlock a lock using your phone, you’ll need to have your app running and your phone’s Bluetooth and location services turned on (with your app authorized to access them).
- Wake your lock (press any button on it and you’ll see its LED light up) and navigate to your mobile app’s list of “Awake” locks to see nearby Bluetooth locks that are broadcasting. If you’re authorized to unlock a broadcasting lock you’ll see a blue key button appear next to it.
- Tap that button on your app and the lock will unlock. Pull open your padlock’s shackle or lock box’s door before the auto-relock delay relocks it.
Removing a Lock Box Shackle
A lock box shackle may only be removed via Bluetooth by an administrator.
- Wake your lock box (press any button on it and you’ll see its LED light up) and tap the name of the lock on your mobile app to navigate to its details screen.
- Tap the “Remove Shackle” button at the bottom of the screen and the shackle will unlock. Be sure to hold your lock box carefully before the shackle unlocks so it doesn’t drop to the ground. Pull the shackle off before the auto-relock delay relocks it.
Troubleshooting
If your lock doesn’t appear on your “Awake” list or you don’t see an unlock button in your app, check the following:
- Be certain your phone’s Bluetooth is turned on and the Master Lock® Vault Enterprise app is authorized to access it.
- Android users also need to have their Location services turned on, with the Master Lock® Vault Enterprise app authorized to access Location. Due to how Android implemented its Bluetooth services, Bluetooth will only work if Location is also available.
- Your digital key may have expired. Ensure you have Internet access (turn on mobile data or wi-fi) and refresh your keys by pressing your Master Lock® Vault Enterprise mobile app’s refresh icon on the bottom right corner of your lock list. This may take a while, depending on how many authorized locks you have.
- Swipe down from the top of your Master Lock® Vault Enterprise mobile app’s lock list to refresh your list of authorized locks.
- If all else fails, you may need to sign out, close your app, restart the app, and sign in again.
Users
People using the Master Lock® Vault Enterprise mobile app or website need to have valid user sign-ins to access your organization. Adding, editing, and removing these users can only be done by an administrator using the Master Lock® Vault Enterprise website.
Administrators
Any user authorized as an Admin may add, view, modify, and delete all locks and users, manage group membership, and unlock any lock within your organization. Normal users without administrator access may only view and unlock the locks they’ve been given access to.
Your organization’s primary administrator (the administrator defined when the organization was first registered) is considered “protected” and cannot be deleted, disabled, have their admin rights revoked, or given an end date. Any admin in your organization may change your primary administrator’s name, email address, and reset their password if you need to reassign their sign-in to a different individual.
Adding Users
Invite a new user to access your organization’s account by navigating to the “Users” tab on the Master Lock® Vault website. Press the “ Add a new User” button to the right of your list of current users to open the “Invite New User(s)” dialog.
Only an email address is required to send an invitation to a new user, but you may choose to edit any other user settings at the time of creation.
Press the blue button beneath the Email Address field to enter up to 50 users at the same time.
You may also copy-and-paste up to 50 users rather than typing them in one row at a time.
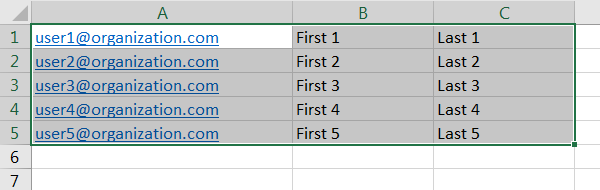
- Copy a tab delimited list of users from a spreadsheet:
- Or you may copy a list of contacts directly from your “To” field in Microsoft Outlook:

- Place your cursor in an Email field and paste (press Ctrl-V or Command-V) to automatically create and populate a new row for each user you pasted:
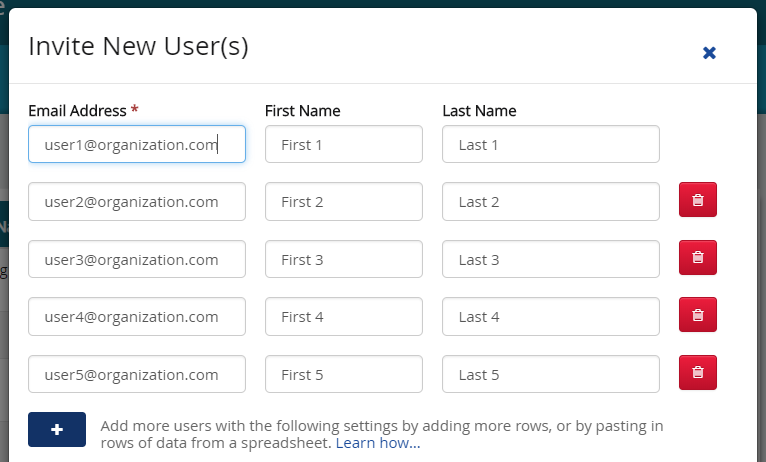
Pressing the “Send Invitation(s)” button will create a new user account for each Email, First Name, and Last Name row you enter (all using the same Enabled, Admin, End Date, and Group Access settings) and send an invitation to each email address.
Editing a User
Using the Master Lock® Vault Enterprise website, navigate to the “Users” tab and select a user from your user list to view its details. Press the “ Edit” button to the right of the screen to modify any of the following information:
- Name. Enter the First, Middle, and Last Name of the user to better identify them.
- Email (required). All Master Lock® Vault Enterprise emails will be sent to this address, which is also the unique identifier used when this user signs in.
- Admin? Turn this toggle on to grant Administrator access to this user. Toggle this off to revoke Administrator access. Non-admins may only view and unlock their authorized locks.
- Enabled? Turn this toggle on to enable a user and off to disable them. Disabled user accounts may not sign in to the Master Lock® Vault Enterprise mobile app or website, but their user record will remain in the system in case you wish to enable them again in the future.
- End Date. If you plan to have a user active only for a limited time, provide an end date and the system will automatically disable that user’s sign-in on that date, stopping their access from that date forward. Removing an expired End Date will allow that user to sign in again.
Administrators may also use the website to edit user settings in bulk, changing the same setting across multiple users at once:
- From your user list, select multiple users by checking the checkbox on the left of that row.
- The buttons to the right of the list will dynamically update, showing the number of users currently selected, and all the applicable actions you may take on those specific users.
- Press a button to take that action, and immediately Enable/Disable, grant/revoke Admin access, set an End Date, or send a Reset Password email to all the currently selected users.
Resetting a Sign-In / Password
If a user forgets their password, or their temporary password has expired, an administrator may use the website to send them a new temporary password via email.
- Select a user from your user list and press the “Reset Password” button on the right of the screen to immediately send a new temporary password to their email address.
If a user experiences too many failed sign-in attempts in too short a time period their account will become locked. They may either wait long enough for the account to reset, or an administrator may unlock their account using the website:
- Viewing a user’s details screen, press the “Unlock Sign In” button to the right of the screen.
Revoking User Access
If an administrator deletes a user or disables their sign-in, that user will immediately lose the ability to sign in to the Master Lock® Vault Enterprise website or mobile app. Note, however, that any manual access codes that user may have seen will remain viable until an administrator changes the codes and has someone perform a Bluetooth unlock to overwrite the old codes on the lock.
History
One of the most robust Enterprise features provided by Master Lock® Vault Enterprise is the ability to record a detailed audit trail of all the lock access and settings changed within your organization’s account.
Administrators navigating to the “History” tab in the Master Lock® Vault Enterprise website may view all access history events performed by any user, on any lock within that organization’s account. See what events occurred, when, to what locks, by what users.
History tables, like any other table within the Master Lock® Vault Enterprise website, may be sorted, filtered, and exported to a CSV file using the “Export” button on the bottom left of the screen.
Clicking on a lock’s name or user’s email address within the history table will navigate to that lock’s or user’s individual details page. When viewing an individual lock or user, select its “History” tab to view a history report for only that one lock or user.
Toggle between the “Access History” or “Changes” views to switch between the two different individual history reports:
Access History
Master Lock® Vault Enterprise records every time a lock is unlocked/locked, activated/deactivated, or its temporary code is viewed.
Some events, such as unlocking a lock using its manual entry code, will not list a corresponding user because the lock cannot discern which person is entering the code.
Change History
A lock’s or user’s changes will show all the modifications made by an administrator to that lock or user, showing what setting was changed, what it was changed from, what it was changed to, when it was changed, and who changed it. This view is helpful if trying to troubleshoot why a code or value is different than you expected, or to see who was responsible for adding that lock or user to your organization.
